Saturday, June 11, 2011

Week 12-Fabric is Back In

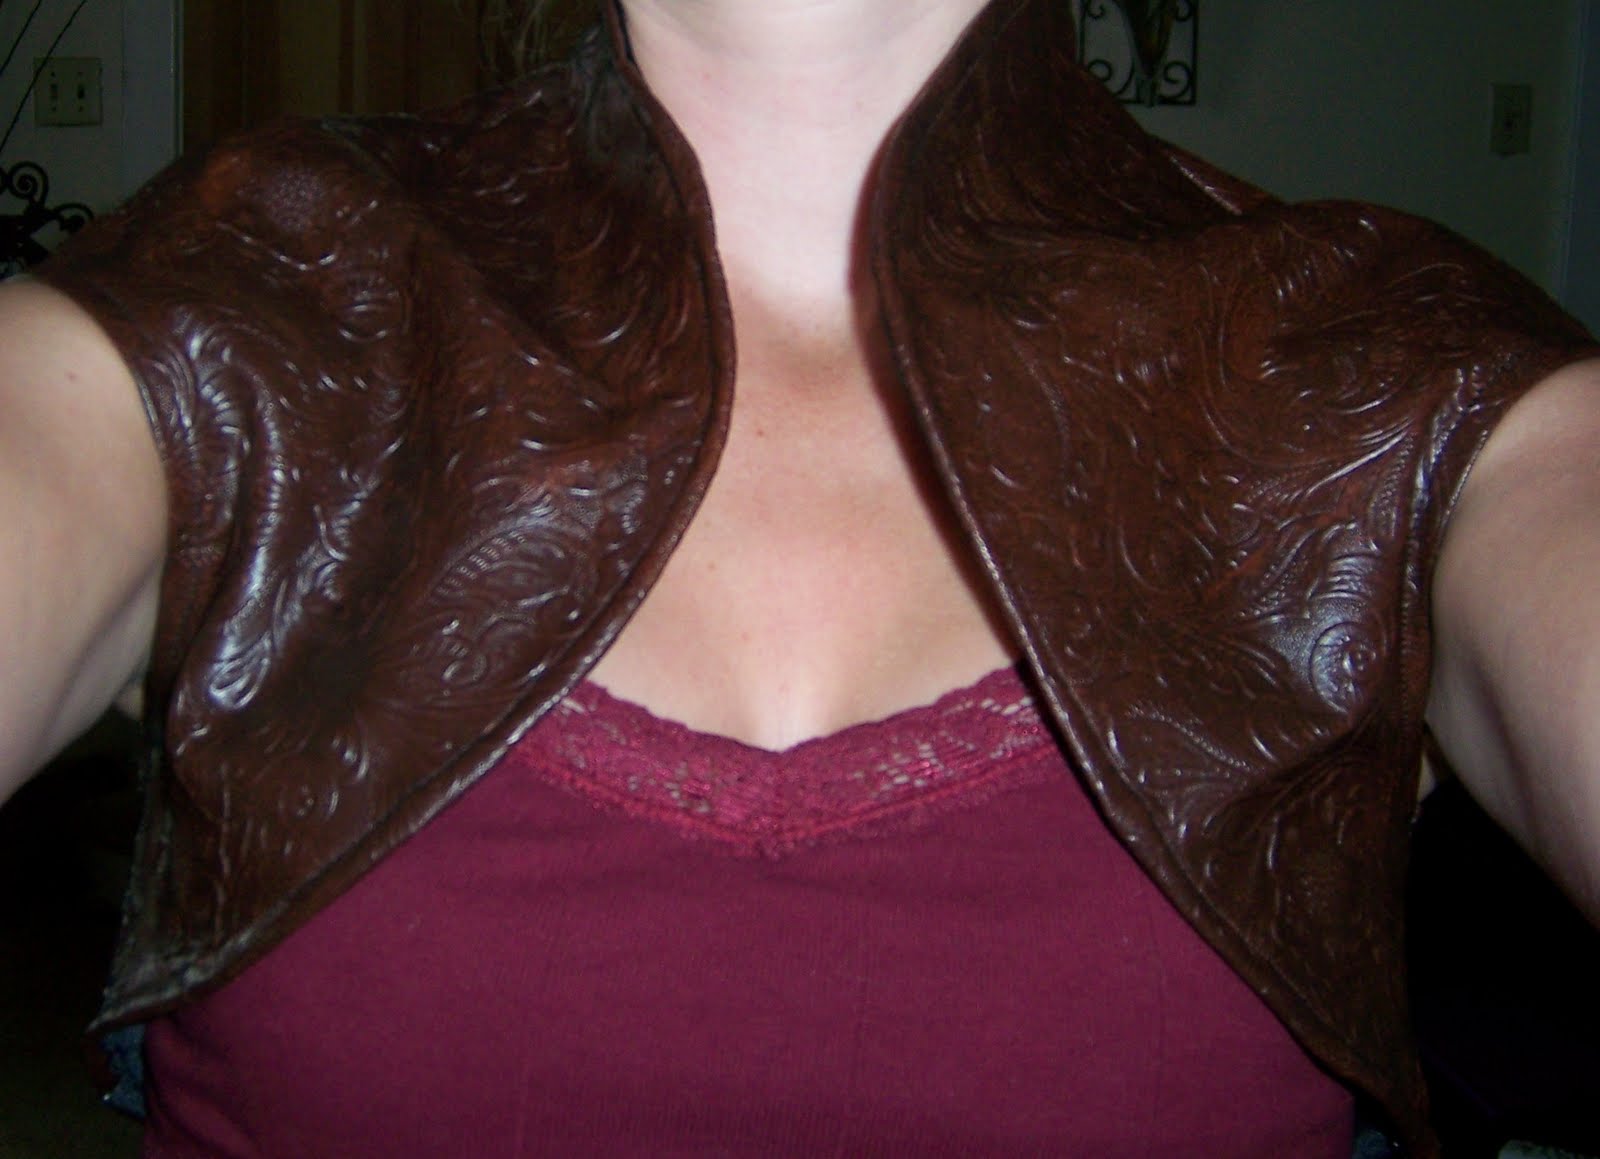
I've decided to allow fabric into the mix, and this week I made a leather-look bolero.


Thursday, June 9, 2011

So...I hurt myself again...

So...yeah...I hurt myself again (surprise surprise- i see those eyes rolling!). I was working, and I heard(and felt) a crack in my hand- my left hand (my UNdamaged hand). My thought process was pretty much "oh shit- that can't be good" and I kept working, aware of the pain- a pain very very similar to when I damaged cartilage in my right hand.

The good news:
In theory, I just pulled or overstretched a tendon in my hand, so no cartilage damage and no physical therapy with a fluidometer (we hope). I definitely didn't hurt it as badly as my right hand so recovery time shouild be much shorter.

The bad news:
I have to wear an immobilizer (stupid little hand brace thing that "immobilizes" my thumb and wrist to keep my from using that tendon), which I also had to wear when I hurt my other hand so I wasn't really surprised, but it's not particularly comfortable and it really limits movement which can be frustrating. I'm also kind of bad about following the rules with wearing this (last time, the doctor threatened to put me in a cast if I kept taking it off to use my hand) which can delay healing...I'll try to be good.


What this means:
What it means is a week or two away from wire work and I have made a decision. I have decided to bend the rules. It's hot out and I like making myself little dresses and fun sewn fabric things and telling myself that they don't count as being creative for the week makes me resent my other projects and forces me into working with a media that maybe i'm just not feeling that week-which means i put out half-hearted mediocre things and that's not good. I majored in both metal and fashion, so why hold myself to only one or the other? So from now on fabric is back on the table. And yes, I did make something this week which I'll get around to posting in the next day or two.

Saturday, June 4, 2011

Week 11

So I did check the scratch window on the new paint this week. In case it was really small i just did a lava shotglass. I scratched it when it was tacky, and I could smear paint. I'm not sure about the window when it's dry. I like the super shiny definitely permanent finish i get with this paint, but i prefer the control i have with my permanamel paint. Wonder what would happen if i mixed the two...


The second project...perhaps doesn't really count because it's an in-progess work...but since it's the type of work you probably read this blog for, you're getting a sneak peek. It's a collar-style necklace which I don't have the ability to harden to the extent I would want to so it's a half collar and the back will be secured with chain or ribbon.


I had a necklace flashing through my head all week. When I sat down to draw it out, I drew something completely different than what was in my head...


And this is the layout in silver. It still needs soldered together (which is the hardest part of any piece really)


I also finally went to see the Hodge Podgery (consignment shop) this week to see if it was for me and maybe pick up a form for consignment. I was not impressed... The shop is about the size of a large bedroom on the outskirts of Harrisburg, and the works featured were the kind of hack jewelry I really hate (oh hi, i bought a bunch of charms at hobby lobby and hung them from a soda tab, aren't i awesome?!?!? I can string beads too! Look what I can do with a silk tie...) and a lot of homemade soaps. It just really wasn't what I expected.

Sunday, May 29, 2011

Week 10

*As my posts are always at the end of the week, this post is for last week and there will be another for the coming week.

New paint. When I used the microbrushes on the bowls a couple of weeks ago, I mentioned that I had bought some new paint. If you have a little boy or a hubby with a hobby, you may have seen these paints- they're designed for model cars and figurines and microbrushes are made especially for this paint. Today, I played with it. I chose something simple because I really wasn't sure what to expect from it.
It's a lot thinner than I expected- thinner than nail polish even, but it doesn't run which is good. It takes 2-3 coats to get good opacity and the swirls on this glass need another coat. I'm not sure how I feel about that since I use the microbrushes to get a thin fluid line, and having to go over it can mar that effect a great deal (at least until I get the hang of it). It has a really fast drying time, but I THINK it just might have a scratch window, and I'll be playing with that in the coming week just to see it can replace my permanamel paint for scratchglass. I'll also be washing it to see if it has a more predictable permanancy that my permanamel paint which I've had problems with random glass partials washing off. I may try baking some of my paint this week too (I've been reluctant to do that because of the possible cracking involved- putting all that time and effort into a glass just to have it crack- kind of like pottery lol), but I really can't have glasses peeling on me. In general, I've washed all the ones I've sold ahead of time, but some that I've given as gifts have not been so kind.


Also, being friends and family, you may remember that Honey(in an act of blatant misbehavior trying to steal chapstick to chomp as punishment for my not playing with her) broke one of my favorite votive lamps last year. I was furious, but kept the pieces in case I couldn't find a replacement. I couldn't find a replacement. I don't really know why I waited so long to put it back together, other than being really frustrated over it being broken, but this week I sat down with a pile of broken glass and a tube of glue, and put the puzzle back together:

If you look at the one on the left, you can see a large crack line in the middle. To be fair I wasn't 100% successful. The impact point was shattered beyond my capabilities, and I'm fairly certain I'm missing several teeny tiny pieces. In the picture below you can see a one inch x quarter inch hole- which i have facing the wall. All those spidery lines around it are broken pieces that i painstakingly pieced back together.
I'll never be able to put a candle in it again for fear of the glue igniting, but maybe i'll get some battery powered tealights...


My week:
I had a very busy week. When I have busy weeks, I get to the end of them, realize I haven't done a "real" project that week, and face the question of whether or not to skip a week. My posts usually go up around midnight between saturday and sunday. Somehow, I still feel guilty if I don't make something. I suppose I have all of YOU to thank for that. lol. I don't think I'd be good about it on my own...

My little nieces were up all week for their birthday. Actually, they're camping right now and I would love to be there but I have to work. I gave them presents on Monday, had dinner with them on Tuesday, and took them to Hershey Park on Wednesday. I worked Wednesday night, and by Thursday morning I was sick with both really bad allergies and a cold (this is what happens when you share icecream with toddlers). How do I know it is not one or the other? Because allergy medicine (claritin) treats the allergy symptoms (burning eyes, sneezing) and cold medicine(advil cold and sinus) treats the cold symptoms (stuffy nose, nasal inflammation, coughing). Neither treats both and I can't take them both at the same time, but I've opted for the cold medicine since I bothered to buy it from the pharmacy counter (i guess most meds with NSAIDs in them have to go from the pharmacy counter- bother).

Also this week, I made fudge which I was fantastically happy with (so was bob of course). I made it in the microwave with 2 sticks of butter, 2 cans of sweetened condensed milk, and 2 packs of chocolate chips (actually I did a pack of chocolate chips and a pack of peanut butter chips), zapped for 5 minutes, and poured it into an 8x8 pan. Delicious, with a texture somewhere between caramel and fudge. It reminds me very much of my favorite chocolate silk fudge from gertrude hawk and I will be remaking it with darker chocolate. I've decided microwave fudge is a fantastic thing.

I also cleaned my house on the off chance that my neices or any of my family would set foot in it. It was pretty messy so it's pretty lovely having the whole thing clean. Well...except the basement...my workspace is a lost cause. lol. AND Bob bought me flowers :)

It also stormed a lot this week and friday night, Honey and I hung out in the tub- i brought a book. Truth be told I love thunderstorms, but Honey really hates them and since she was clearly torn between hiding and being with mommy, I just gave her a place to hide with me.

Saturday, May 21, 2011

How to: Fairy Wings

I've made a couple sets of fairy wings on here now, so I thought I'd post a how to.


Supplies:
-12g-14g wire. preferrably galvanized steel, but some aluminum ones will work too


Assuming you read this blog on a regular basis, you'll remember that i had a problem on my first pair of wings with the aluminum wire being too soft. I made the second pair of wings out of a different brand of aluminum wire (pictured) which is harder and holds its shape better than the other brand i had.
 -Fabric (for the purpose of this tutorial, i use sheer woven synthetics)
-Tacky Glue
-A Lighter (preferrably the kind you use for candles, not the kind that burn your fingers if you hold them too long)
-Glitter paint

How to:

Step 1- Choose your design. It helps to make a paper or cardboard pattern

This is a pattern for some kid's wings
Step 2- Form your wire frames for each wing segment

Step 3-coat both sides of the wire frames in tacky glue

Step 4- Lay the glue covered frame on fabric, and fold it over so it's sandwiched and sticking

Step 5- Cut out the wing segments

Step 6- Use a lighter to melt the extra fabric around the frame

Step 7-Paint glittery patterns and melt any holes you'd like to add.

My holes aren't great on the purple set because i used a high-powered grill lighter and it wasn't cooperating. You may want to use a match for the internal holes. It helps to cut them out, stick the lighter up through and then carefully melt.

Step 8-Attach tops to bottoms and then the two halves. I like clear electrical tape for this

In this picture, I had the bottom halves upside down. Whoops!
Step 9- Decide how you want the wings to be worn. If you'd like strapless wings (worn down the back of a bra or corset), add a sturdy u-shape loop of wire to the center joint and wrap sharp edges with electrical tape(like the white wings at the top of the page). If you want straps, you can wait until you're finished and tie a long ribbon to either side of the middle joint.

Step 10- Wrap the center joint with ribbon, or conceal by gluing flowers. Position wings. Add ribbon straps if desired.

Week 9

Fairy wings have a metal frame, and I enjoy making them, so they totally fall into the category of glass or metal. :)

I made these purple wings with a little head circlet for my niece, Lily. Her little sisters are turning 2 this week and will be getting LOTS of presents (I know I bought too many, and I am not their only aunt...), and I figure it never hurts to have your own cool new thing as a toddler.


Other things I did this week:
-fixed Bob's favorite jeans
-Altered a dress that I ordered online a long time ago that I thought would be totally cute, and then it came and looked waaaay too much like a nightgown for public wear. I took the sleeves off and turned it into a halter dress
-Also, more peel-n-stick nail polish!!! This is incoco brand, and I like it better than the Sally Hansen salon effects.

Friday, May 13, 2011

Weeks 7 & 8

Full disclosure: I've been working overtime (feast or famine, eh?) and the time I did have, I spent enjoying the (finally!!!) warm weather. I have a tan, I went to a carnival, spent lots of time outside with the dog, replanted and weeded my gardens, and in general spent last week having a good time. No, I really didn't feel like making anything, so I didn't. I didn't really feel like making anything this week either, but I decided 2 weeks off is a no-no so here we go:

I bought some micro-brushes at Hobby Lobby yesterday so I tested them out on some bowls. I also bought some model car enamel that should be even more permanent than my glass paint, but I haven't tested it yet.
The biggest one is modeled after my wedding invitations.


Random fun: I took off one of my headbands while I was outside this week, and Honey ran across the yard and popped her head through the loop, so I took the extra one that I had and made her another new collar out of it. It's black with white polkadot circles. I didn't take this picture to showcase her collar, but since it was on the camera, I thought I'd share.

(I took the picture because she ran into the room and perched herself on Bob's shoulder while we were watching a movie on the floor. We're pretty sure she was afraid of something, probably random weather patterns, but we both thought this was ridiculously cute)

This isn't really an art project in any way, but I "painted" my nails this week. These are the peel-n-stick salon effects nail strips by Sally Hansen, and they are pretty awesome. This set is "Laced Up", their black lack pattern. I got lots of compliments on these at work.


*If you get curious and purchase these to try yourself, I have some tips from my own trial-and-error. The first thing you should know is that if your nails are a conservative length (an eighth of an inch to a quarter of an inch) you most likely can use each nail strip twice and get twice as many manicures out of the box (At $10/box, it's kind of expensive for nail polish, but cheap for a fancy manicure). I also primed my nails with a base coat and topped with a top coat. The top coat came after a day at work where i did mildly chip this manicure (they are chipped in the photo). This particular design hides chips really well, and people with a regular job probably won't have chipping as fast as I did, but it doesn't hurt to put a top coat on to protect it.